Repairing a Lenovo Flex 5 Laptop With a Corrupted BIOS
July 28, 2024, 4:50 PM
You will need:
- A working computer with Ubuntu 24.04 LTS
- A CH341A programmer with a 1.8V adapter and SOIC clip
- A T5 screwdriver
A few years ago my brother's Lenovo Flex 5 laptop stopped working. When powered on, the lights on the Esc and Caps Lock keys would turn on, but the screen would remain off. This is a well known issue with this laptop. Lenovo had pushed a BIOS update through Windows update, which if interrupted would corrupt the BIOS and brick the laptop.
The laptop was unceremoniously added to our pile of dead laptops until recently when I was looking to salvage some laptop DDR4. When I saw the RAM on the laptop was soldered I decided to give fixing it a shot instead. This is my first attempt at BIOS flashing so I documented my steps in this post.
The laptop model is the IdeaPad Flex 5 14ARE05 Type 81X2 with AMD Ryzen 5 4500U and 16GB RAM. Some of the steps in this post are model specific, namely the specific regions to copy when patching the BIOS and the voltage to use for the BIOS chip (using the wrong voltage can fry the chip). If you have a different model you can still follow these steps this as a general guide, but you will need to look online to find the appropriate values for your model.
Downloading the BIOS Installer
To repair the BIOS we need a non-corrupted copy of the BIOS. The latest BIOS installer can be downloaded from the Lenovo website. As of writing the latest BIOS version is EECN44WW.
- Go to https://pcsupport.lenovo.com/us/en
- Enter your laptop's serial number into the Search PC Support box (the serial number can be found on the sticker on the bottom of the laptop)
- Click Drivers & Software
- Find the box that says Manual Update and click Select Drivers
- Click BIOS/UEFI
- Download the latest BIOS installer
- Save eecn44ww.exe to the Desktop
Extracting the UEFI Capsule
Lenovo provides the BIOS only in the form of an installer runs on Lenovo laptops. This isn't going to work for us since the laptop is bricked. We need to get the BIOS firmware from the installer in order to flash it. First we will extract the UEFI capsule from the installer using innoextract:
- Download innoextract-1.9-linux.tar.xz from https://constexpr.org/innoextract/
- Save the archive to the Desktop
- Extract the archive to ./innoextract-1.9-linux
- Open the terminal
- Set the current directory to the extracted archive directory
cd /home/[username]/Desktop/innoextract-1.9-linux - Extract the BIOS installer
./innoextract /home/[username]/Desktop/eecn44ww.exe - Move the extracted EECN44WW.cap to the Desktop
mv ./code\$GetExtractPath/EECN44WW.cap ../EECN44WW.cap
Extracting the BIOS Firmware
We now have the UEFI capsule, but we cannot flash it directly. We will use UEFITool to extract the BIOS firmware from the UEFI capsule:
- Download UEFITool_NE_A68_x64_linux.zip from https://github.com/LongSoft/UEFITool/releases
- Save the archive to the Desktop
- Extract the archive
- Inside the extracted archive double click uefitool
- If UEFITool does not open or throws a shared library error open the terminal and install Qt 6
sudo apt-get update && sudo apt install qt6-base-dev - Inside UEFITool click File > Open image file... and select EECN44WW.cap
- Extract the BIOS firmware by right clicking 6C60EE00-C316-4C95-A684-CDC7E7033311 and click Extract body...

- Save File_Raw_6C60EE00-C316-4C95-A684-CDC7E7033311_body.fbd to the Desktop, renaming it to unpatched.bin
Connecting the CH341A Programmer
In order to flash the BIOS chip we need to connect the working computer to the BIOS chip on the bricked laptop. We will do this using a CH341A programmer.
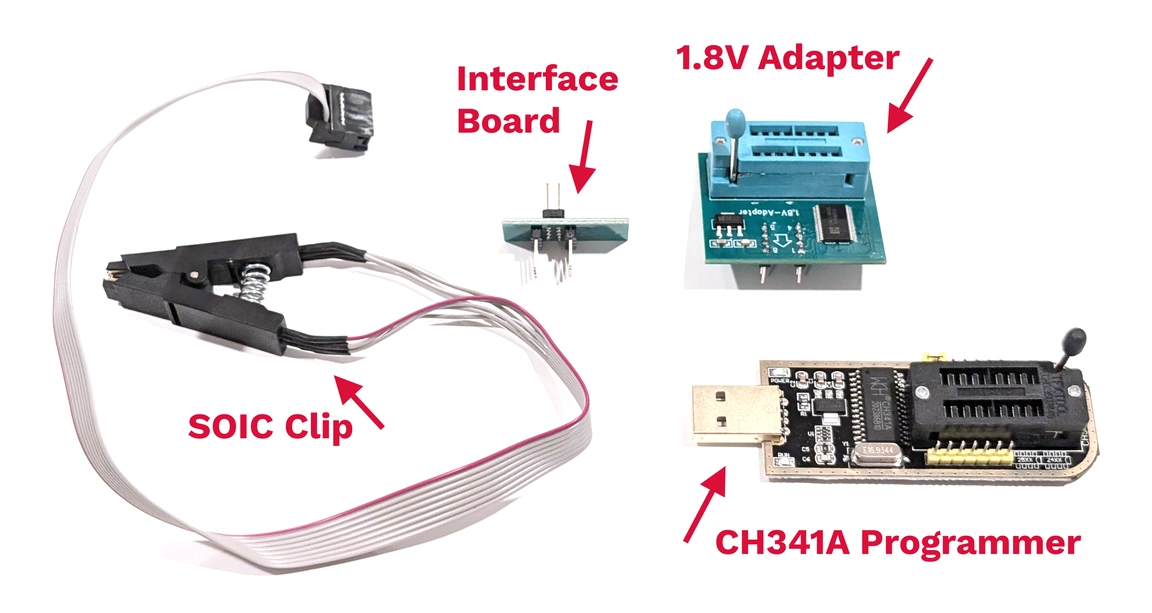
Assemble the programmer:
- Insert the 1.8V adapter into the CH341A programmer. Pull down the arm to lock it in place. Make sure you are inserting the adapter into the 8 holes furthest from the arm. There is only one orientation the adapter will go in.
- Insert the interface board into the 1.8V adapter. Pull down the arm to lock it in place. Make sure the numbers 1-8 on the interface board align with 1-8 on the adapter
- Insert the female end of the SOIC clip onto the interface board. Make sure the red wire aligns with the pin labeled 1 on the interface board
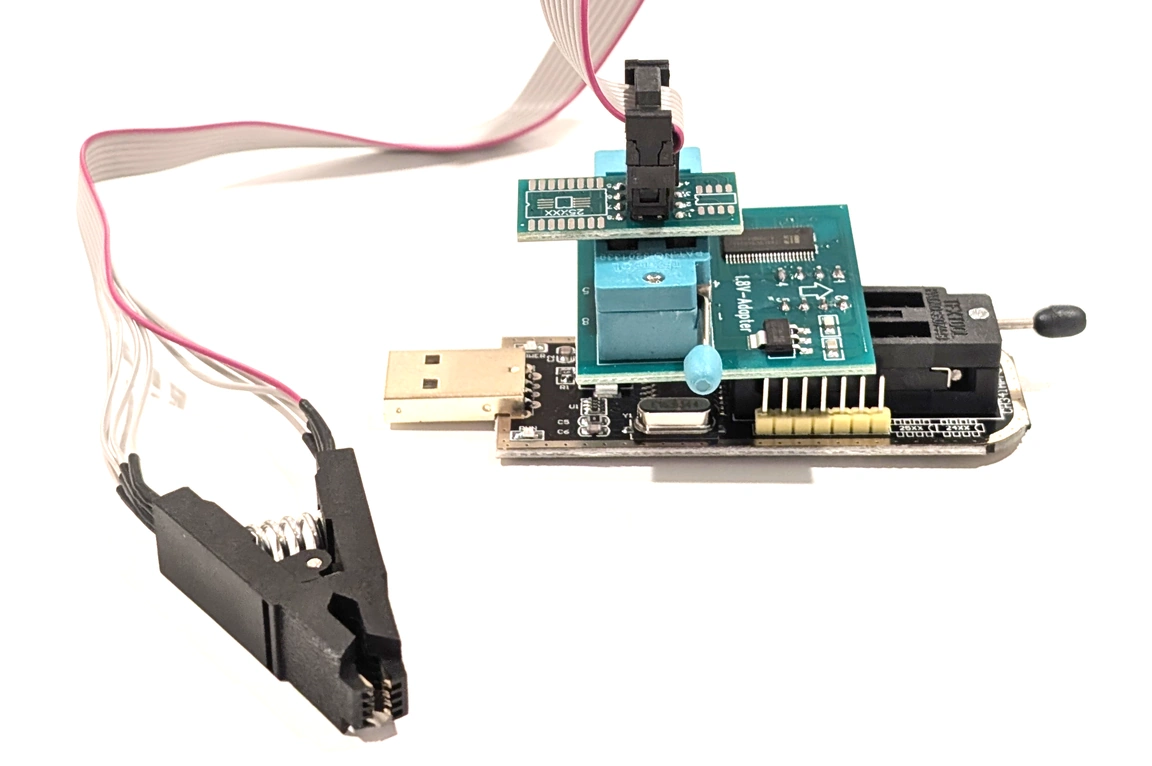
This is what the fully assembled CH341A programmer looks like:
Connect the programmer to the bricked laptop:
- Power off the laptop and remove it from wall power
- Remove the screws on the bottom of the laptop using the T5 screwdriver and remove the back cover
- Unplug the laptop battery. The battery will remain unplugged for the entire flashing process
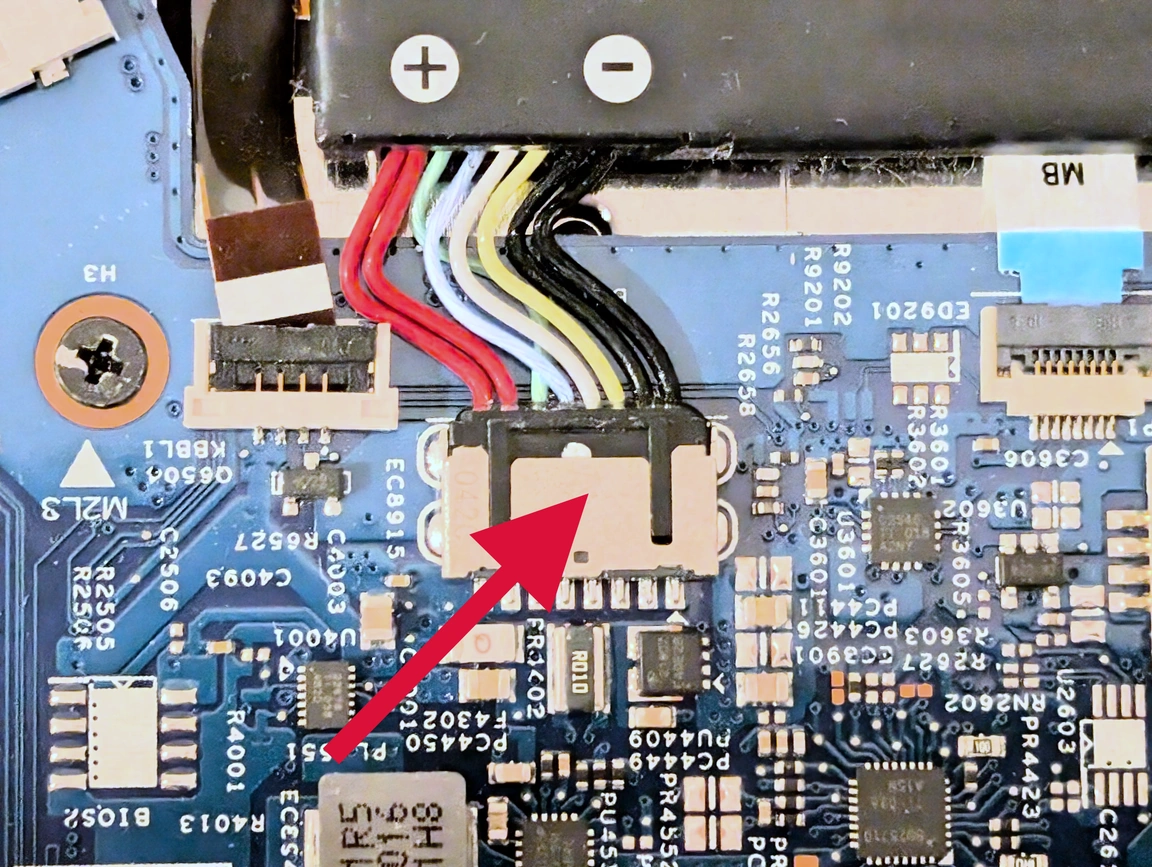
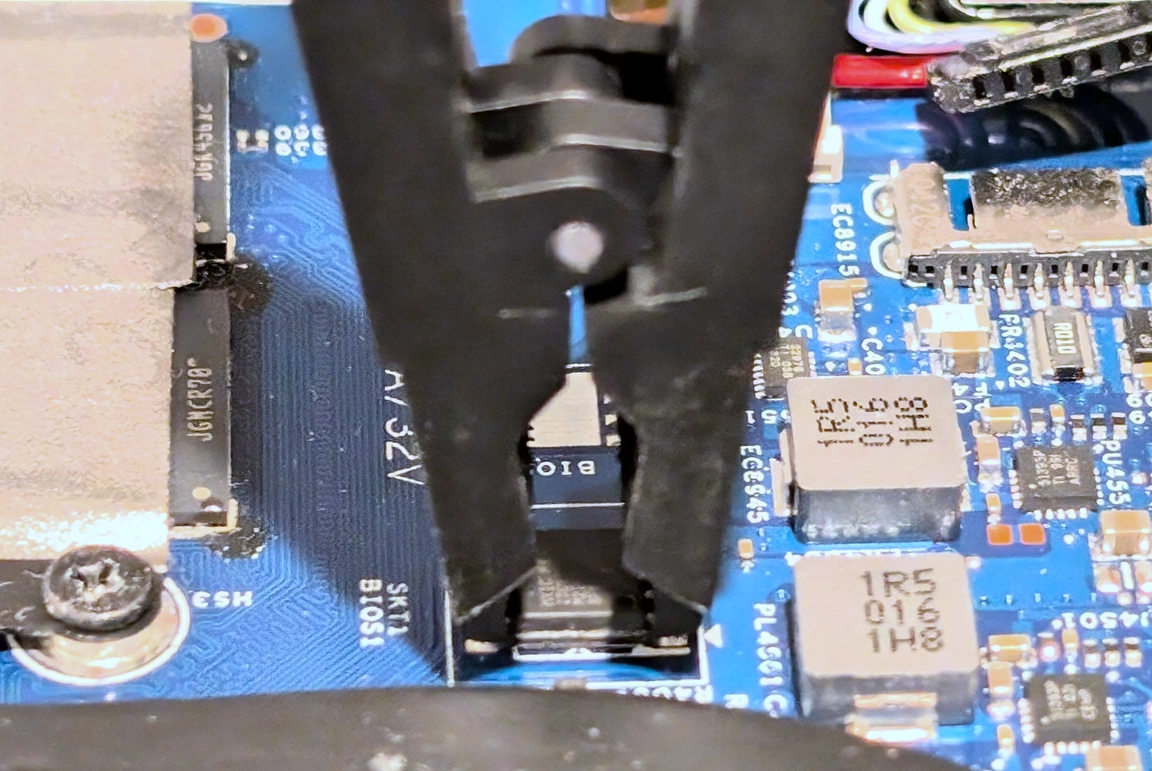
- Find the BIOS chip on the motherboard. It is located above the bend in the heatpipe. Take note of the triangle. It should align with the red wire when attaching the SOIC clip
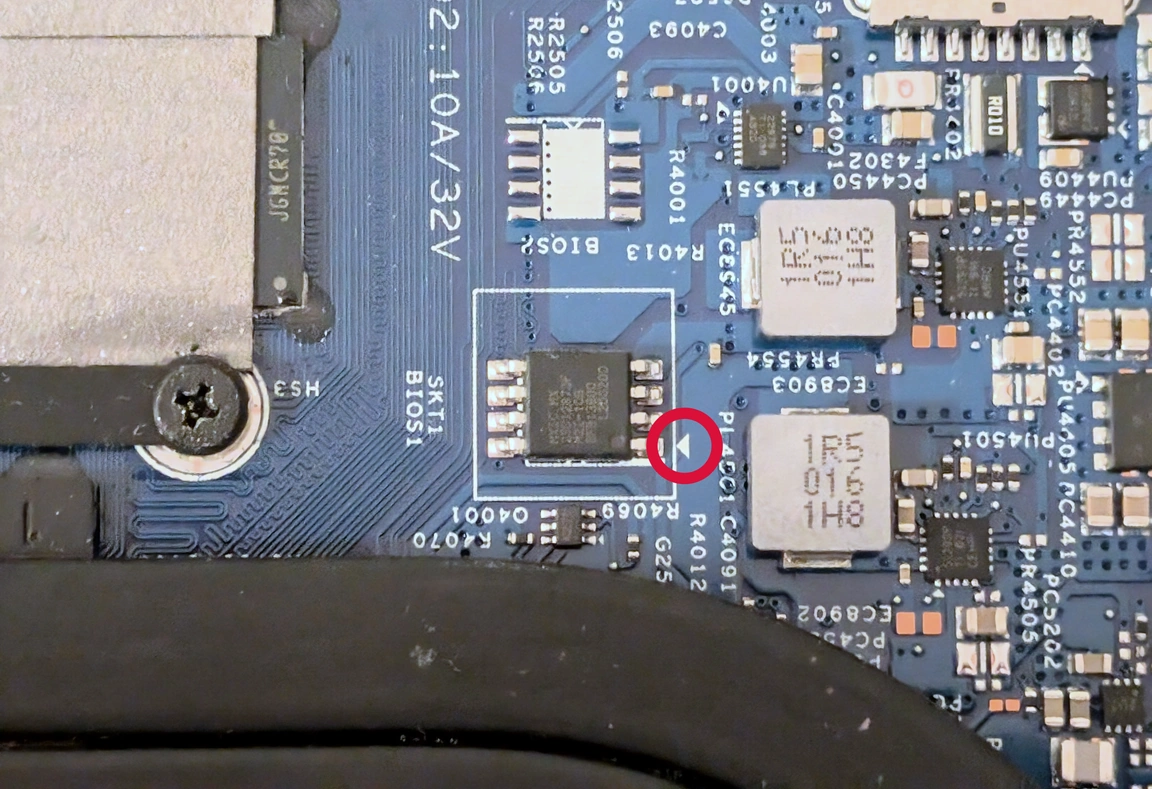
- Attach the SOIC clip to the BIOS chip
- Plug the USB connector on the programmer into your working computer
Backing up the Corrupt BIOS
Before we flash the BIOS we need a copy of the corrupted BIOS so we can copy some values from it. We will do this using flashrom:
- Open the terminal
- Install flashrom
sudo apt-get update && sudo apt-get install flashrom - Set the current directory to the Desktop
cd /home/[username]/Desktop/ - Dump the corrupt BIOS from the chip (this may take several minutes)
sudo flashrom --programmer ch341a_spi -r backup.bin - If you get an error try repositioning the SOIC clip
- Create an extra copy of your corrupt BIOS as a precaution. Once we flash the BIOS, we will not be able to recreate it
cp backup.bin backup2.bin
Patching the BIOS
We will now copy the BIOS regions containing system specific information (serial number, Windows license key, etc.) from the corrupted BIOS to the BIOS we extracted from the Lenovo installer. We will do this using GNOME Hex Editor:
- Open the terminal
- Install GNOME Hex Editor
sudo apt install ghex - Open GNOME Hex Editor
- Inside GNOME Hex Editor click Open and open backup.bin
- Click Open and open unpatched.bin in a second tab
- Copy the byte ranges 0x21000-0x37D8F and 0xB21000-0xB21280 from backup.bin to unpatched.bin
- In GNOME Hex Editor you can jump to a specific byte by pressing Ctrl+J
- Click and drag or press Shift+PageDown to select the byte range. GNOME Hex Editor shows the selected byte range in the bottom left corner
- Make sure to also select the entire range in the file you are pasting in. If you do not data will be inserted instead of replaced
- Do not worry if the location you are copying to looks slightly different (FF instead of 00). Just make sure the byte ranges match exactly
- Press Shift+Ctrl+S and save unpatched.bin as patched.bin
Flashing the BIOS
We will now write our patched BIOS to the chip using flashrom:
- Open the terminal
- Set the current directory to the Desktop
cd /home/[username]/Desktop/ - Flash the patched BIOS to the chip
sudo flashrom --programmer ch341a_spi -w patched.bin - Wait for flashrom to write to the chip (this may take several minutes)
Reading old flash chip contents... done.
Erasing and writing flash chip... Erase/write done.
Verifying flash... VERIFIED.
- Remove the CH341A programmer and plug the laptop battery back in
Verifying Everything Worked
After flashing the BIOS, the first time I started the laptop it briefly showed two lines referencing the CMOS being cleared (from the battery being unpluged) before returning to a black screen. Starting the laptop for a second time resulted in a successful boot.
Press F2 to enter the BIOS and ensure the serial number matches what is on the bottom of the laptop. If they match, you have successfully repaired your laptop!
I would have not been able to write this post without the knowledge from these two posts on the Win-Raid Forum:
- https://winraid.level1techs.com/t/solved-lenovo-flex-5-14are05-bricked-black-screen/36736
- https://winraid.level1techs.com/t/guide-how-to-use-a-ch341a-spi-programmer-flasher-with-pictures/33041